

Jan 2003 - Actually started this project in December. After following the treads on the Totally Triumph Network and TriumphSpitfire.com, I decided to take the plunge and based on the treads choose the Spitbits (Bell) Stainless 4-2-1 Header. I wanted to keep the existing standard exhaust. I did not want the sound to be too loud and TPO had put a cool chrome end on the muffler that I wanted to keep. To achieve this Nigel from Spitbits determined the stainless pipes I need and all was ordered. These were in such demand it took several weeks for the parts to arrive from England to Spitbits.
Now here is the twist, after much research I determined the head dissipation and performance would be improve by ceramic coating the header. I decided to include the pipes to further keep the heat in check and maybe further aid performance. I found on the Web Performance Coatings. www.performancecoatings.com . Their great web site gives all the information I needed. I had Spitbits ship the Header and pipes to Performance directly. I choose Black Satin as the color. The chrome look I thought would be hard to keep clean/unscratched. I could repair any scratches with black exhaust paint. The temp range of satin is 2000F versus @1000 for chromelike.
Everything came back from Performance neatly wrapped in foam wrap. Mistaken I remove it admire the work and it did look great. Later I replaced the wrapping to protect the pipes after adding a few scuff marks on my first dry fit.
The first evening it warmed up to over 20F I started to remove the Weber/Intake Manifold the old Exhaust manifold and Cat Converter as a unit. Everything came off very easily. I getting good at the lower manifold bolts. See my Weber Carb project.
Old Manifold and Cat Converter


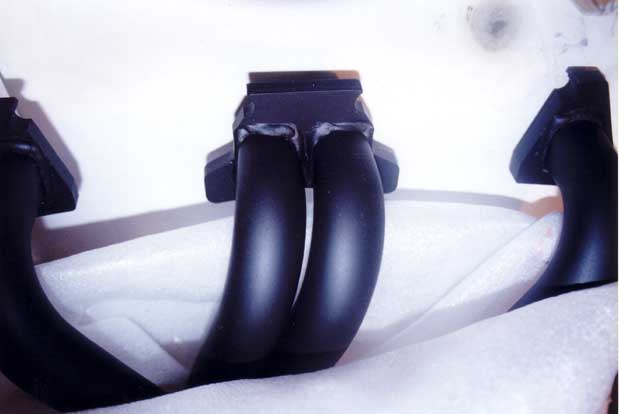
But then I tried a dry fit of my Header. Hey it won't fit. You can see on the picture below that the frame and motor mount would not allow the header to clear.


Well you can see the wrapping is off. Not wise. Checked the TTN Network and Jeff suggested to support the engine remove the motor mounts and lift it up a inch or so. Call Nigel same advice. So with much apprehension, I started. Drained the radiator. Removed the 2 radiator hoses to allow movement. Supported the engine with a floor jack and wide piece of wood to spread the load. Removed the right mount and tested to see if that was enough to clear. It was not. Then I removed left and raised the engine a 1/2 inch or so. Fit the gasket next. Unidirectional, but I put the raised end against the block With a little left push it was able to clear.


Once cleared (see above) I mounted the header onto the bolts very tight fit, but it fit. Replace the heater pipe that serves as the washer on the rear bolt and the front outside bolt to hold lightly. Fitted the intake manifold and Weber as a unit. Started the bottom 2 long nuts then the remaining. I like using anti-seize compound on treads getting heat. I think it protects me when a later removal is needed. (see Carb section for details). Tried my new Torque wrench to the 26' recommended. You only have room for the wrench on the top nuts. Must estimate on the remaining.
I then reattached the hoses to the carb and radiator. Trying to remove the old pipe from the muffler was a no go from under the car, so I removed the muffler and pipe as a unit. It was still rusted tight. Off to the hardware store for a propane torch. Not enough heat to help enough. So I took the entire unit to the local Tuffy muffler shop (thanks Steve). He used a real torch to heat the connection red and it separated.
Since I had the muffler off I decided to paint it with black exhaust paint to match the header. Cleaned with acetone (great stuff- use it on the boat all the time) and sanded a few rusted areas.


Next the easy part. Attach the new pipes or so I thought. The first problem was the direction of the pipes down versus tight to the body. I found that this was due to my trying to fit the pipes as tight as possible because it was too long for the muffler to align with the holders. This caused the angle to change.

This is the worst case gap needed to fit. By realigning pushing in the pipes as far as the straight lengths allowed I could get it to within 1/2-1''. But it would not raise to the full height needed to attach even if the gap was spanned.

I talked with Nigel at spitbits and he confirmed the lengths of the pipes I had. Measuring them I had the same lengths. So I'm at a loss to explain the problem. Also the pipe was not centered in the channel, so I was concerned on clearance during driving on rough roads.
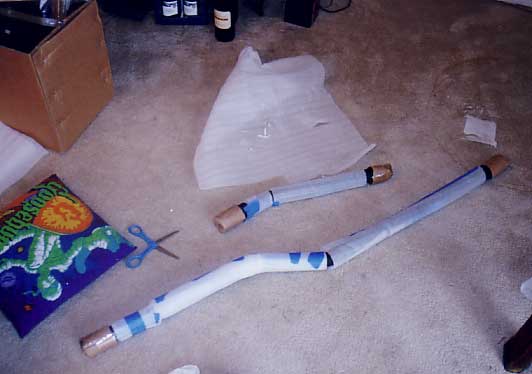
So after 2 days of playing with it I decided another trip to Tuffy's was needed. I though of cutting the pipes, but was concerned that once I did I could ruin a pipe if I was wrong. Since they are pricey and ceramic coated I thought a pro was required. Plus the Trans mount was missing and the rear Diff mount position was iffy. I received the new champs and holders from Spibits and after painting them black as well, I had all the parts.
Steve at Tuffy's said it was OK to run the engine with the 2 pipes attached and no muffler (he could not take it today however). So I went home and fitted the two pipes tight to the correct position. Light pressure on the clamps to allow removal. I used a coat hanger to hold the end up at the Diff mount holder.
Replaced coolant. Then I removed the coil wire . Its been sitting un-started since Thanksgiving. Cranked until I though oil was everywhere. Reattached. After several attempts is started. Backed it up in the drive and let it run at high idle as I watched for leaks. It was fine but loud. It does sound promising.
Now I need to wait for a dry/low low salt day to take it to Steve for final fitting.
2/8/03 More to come
3/15/03
The Day finally arrived. It was going up to 50 degrees today or first hint of spring.
I brought the Spit to Steve's Tuffy shop with the muffler and all the new clamps. After inspection they saw they needed to cut 1" off the last pipe. After that it still needed 1/2 inch off and they needed to bend the middle pipe to center the exhaust pipe in the center of the tunnel. Definitely not a do it yourself dream project. So if moving to a new Sports header plan on taking it to a muffler shop for final installation unless you have the proper bending and cutting tools. Pictures of final installation to follow.
The car sounds and feels stronger. The stock exhaust I think was the right choice for sound/performance balance. Not much change to drive it yet. Lots of melting snow on the roads. I found the driest road home then washed the wheel wells and rocker panels and put her back to speed.
My remaining concern is the Header and intake manifold clearance. At the number one cylinder area they almost touch. Nigel at Spitbits says it will be OK, but next time I disassemble to file the intake manifold to add clearance. Here is a picture. I will watch and see the effects. Note the material stuck between the header and intake is the foam wrapping that I had on the header. I will try a remove it or left it burn off.

I posted the question on the Totally Triumph network today and received the answer I hoped for. Nothing to worry about but I can file a little the next time I need to remove it. Took a drive today. I purrs and runs stronger. I'm a happy camper.