You can see the old Stromburg and Calif. mess I started with.

I just finished my install of a Weber DGV, but with
Cannon Manifold. Here are a few observations.
Removing the intake manifold is tricky. Go at it with a thin or stubby open
ended wrench from underneath and the front, point the wrench at the lower
"bolts" so you just get a grip and loosen. You cannot get it to fit on
normally.
I needed to shorten my accelerator cable. Go to a bike shop for fittings and ask
them to shorten with their cutters and finish off the end(s). Also they had
brackets I could use as a return spring mount. (Not included in my kit, but the
cable did not always return to full rest without the spring).
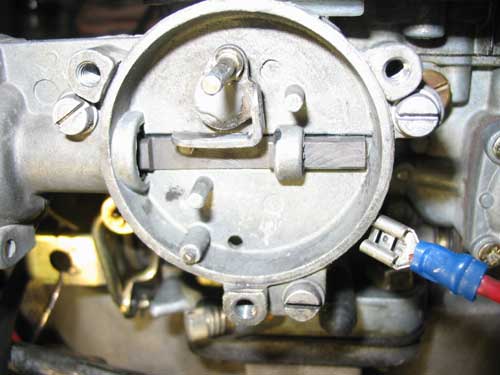
My Electric Choke is adjusted such that the brass electrical connector is
pointing at 3:00 o'clock looking from the passenger side facing the carb.
Adjusting it tighter had little effect on my problem. The High idle will set
correctly until after starting you blip the accelerator then it falls off. No
fix yet, but I just leave it in the drive at high idle until its warms.
Can send you some digital pictures of my linkage if you like.
A course treaded 3/4 inch plug (home Depot) will fit the EGR Valve opening in
the exhaust manifold. Doesn't seem to leak, but I have on order a fine threaded
version. (can't find locally).
Runs like a dream after warming, stumbles when cold. Told that was normal by
Spitfire Mechanic with 30 years experience.
It was suggest to knock out all the cat converter stuff to allow it to breath
better and less of a fire hazard. But had mine back together before I got the
advice.
For the breather I ran a hose from the rocker cover to a plastic t valve (Home Depot). One end to the air cleaner the other long hose to just below the bottom of the frame. Spit mechanic told me that the Venturi effect as I drive will create the negative pressure needed to help vent the crankcase. That is the method they used in the old days. Some oily moisture will drip on your garage floor, but very little.
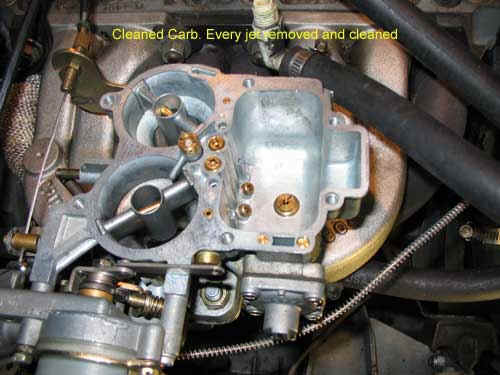
The Weber DGV I have came with the car to be installed.
It looks new or lightly used. Some Redline brochures came along. After fitting
it with the Cannon manifold here are my problems. (PS to get the bottom manifold
nuts go in with the wrench from below pointed at the front of the nuts, not the
side (45 degrees- like sailing).
1) removed the ERG Value need 3/4" fine treaded plug to fill the outlet.
I've been everywhere, even Spitbits doesn't have it. The 3/4" course
treaded plug I picked up from home depot screws in easily (may not be
airtight?). Anyone know a source?
2) The throttle cable has a barrel fitting, my Weber has a simple hole looking
for a fitting. Anyone know where I can get a fitting? Spitbits didn't have it.
3) I cannot get enough Accelerator pedal movement to open the throttle
completely. The throttle cable is long. Not sure if that contributes.
4) I have the manifold heater fitting but no stud and nut to attach. Nigel
looked but no joy again. Tried Murrays, found a stud where the side into the
manifold is a course thread (I think 5/16") fit. The other end is
different.


See the black bracket (green arrow), it is from the bike store again. I could not locate an original. Used it to fit a return spring (Pierce) from the round fitting to a hole in the bracket. Spring not shown. Notice a sailors seizing wire holds the cable housing to the first bracket. It was pulling back at times (return spring may make that unnecessary). I need to clean up the bracket and the cable is too long but it works great.


Hood
Clearance- notice small indent in heat shield where carb. touches.
With my new 4/2/1 header I noticed a little hesitation at about 3K RPM. Based on my research on the TTN, TriumphSpitfire.com and the Weber sites it pointed to a need for a bigger idle jet. Plus when cold I would get some misfires and hesitation. After calling Pierce I switch from a stock (.60) idle jet to a (.65). Purchase several jets since the cost is mostly shipping. I have a .70 in waiting.
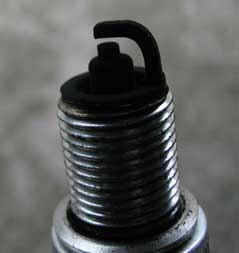
Taking a day trip this weekend with the Detroit Triumph club gave me a good test. It seemed to run smoother and stronger. I will check the plugs in a few days to see if the color tells me something. I also installed a Pertronix's II electronic ignition with a Flamethrower II coil. With my low compression I'm told it will have little benefit, but I will see. They say you can increase the plug gap .05 to allow more resistance and a stronger spark. I will try that later. More details to come soon on this site.
ColorTune System
This weekend after many attempts to tune my Weber Carburator to its best setting I tried the ColorTune Kit that came (free) with all the other parts that came with my car when I bought it.
Earlier I increased the jet size to .65 due to the added Header and a hesitation
at around 3K RPM. It fixed that but I still had black smoke at idle and plugs 2 and 3 showed carbon buildup. It was rich but how rich. The ear method recommended was not working for me.
So I tried the ColorTune. At first it was yellow (rich), I leaned out the mixture until I saw blue. 20
minutes total time. It runs better than ever. Great product., highly recommended.
The ear method reminds me of my first job over 30 years ago at Burger Chef. Before timers they told us "the fries are done when they sound like dry leaves". Well they always sounded like dry leaves to me. I lasted 2 weeks.
I've been having a problem with the idle holding when I take my foot of the accelerator when stopping. Here are the details and what I've found so far. Or skip the story and go to the solution.
For the past few weeks I've been chasing down a stalling problem. Weber DGV, 4/2/1 Header, 76 Spit. larger idle jet,
vacuum advance disconnected, mech. fuel pump, Flame thrower coil, Pentronix II ignition, electric Fan. Also noticed oil on the block under the fuel pump. Hose from valve cover to bottom of frame for venting.
Almost every time I let off the gas and push in the clutch when stopping the RPM drops until it almost stalls. I must blip the acelerator to get it to hold idle as I brake. Today I increased the timing 12-15 BTDC. As it idles faster in the garage I lowered the idle on the Weber to 800 RPM. It seems to hold well and when I rev the timing advances. I took it out tonight for a drive still the same problem. Also tried putting it in neutral as I brake to
eliminate the clutch as a issue. Samey same.
When I was rechecking the timing. Elect Fan running. I noticed when I turned on the headlights the idle dropped. Voltage drops from 14 to 13 V. on the gauge. Turn them off idle increases. I have a new rebuilt Alt.
Could the amount of voltage be the issue. I tend to drive with the headlights in the daytime too. Detroit is SUV ville.
Also should the vacuum outlet on the carb be blocked off or left open to the air?
YES
The first thing a friend in the Detroit Triumph club found was my vacuum advance plate did not move. When I installed the Pentronix's II I lost the tiny screw that hold the plate down. The longer screw was stopping the plate from moving. A small hacksaw later it was fixed. Still no joy. Oiled Distributor per manual, increase timing 15-17 BTDC, idle to 900 Rpm and increased fast idle so it starts at about 1200-1500 rpm. The voltage still drops but the idle seems to hold. I will continue to monitor it.
Over the course of the last year I've been chasing a sooty rich mixture and well as the stalling issue mentioned above. It also required the constant cleaning of the chrome bumper from the stains of the exhaust. A club member mentioned he smelled gas as he followed me.
Here is a brief story on my quest and the "I think" the final solution. Here is my initial question posted on the TTN. Or skip to the end of the book.
Good description of the problem
Foxtrapper - A sooty fumey exhaust means it's not burning. It doesn't burn because it's either too rich, or too lean, and runs out of molecules. Too rich, and it runs out of oxygen molecules in the air, too lean, and it runs out of hydrocarbons in the liquid gasoline. Both result in incomplete combustion, which gives fumes and smoke. Of the two, excessively rich is the one that causes lots of smoke. Both cause fumes.

 Stay tuned this may look bad but the issue was not as
much the design, but something else. But you can see why I was suspected
the design.
Stay tuned this may look bad but the issue was not as
much the design, but something else. But you can see why I was suspected
the design.
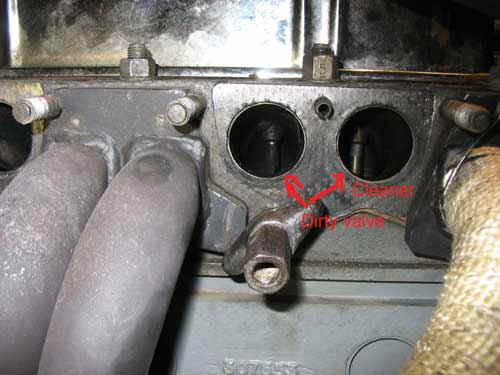
My new 4/2/1 Header was touching the intake Manifold. This made me suspect heat from the exhaust header was overheating the mixture on 1 and 4.


So I went after that issue. First by installing the manifold coolant system. Then by shaving the manifold and heat wrapping it.


I also noticed the stud treads were stretched. So I retapped the treads

No leak after installation and any potential of a heat problem was minimized.
Ran test
Foxtrapper - Luckily, it's easily detect. Start the engine and let it idle. Take some carburetor cleaner and spray it it at the manifold/head connection. Spray carefully and thoroughly, particularly on the underside. I would not be at all surprised if you find the engine note changes substantially when you spray. If so, you've found your problem and can proceed to fix it.
Today I checked the compression around 140/150 each.
I have a partial answer to my Dilemma. I took the car to a local garage. The mechanic noticed #1 wire was a little lose on the distributor. I replaced the wires and now all plugs are about the same. Black/sooty on the outside. Brown/tan on the ceramic and tip.
Foxtrapper - The Weber DGV is a low pressure carburetor, and is easily overpowered by many fuel pumps. The aftermarket replacement fuel pumps sold for Spitfires typically have far too much pressure for the Weber, not to mention the SU or ZS. If you do not have a pressure regulator on the carburetor, you can easily have too much fuel in the bowl, resulting in an extremely rich running mixture. I say running mixture because many times you will mask the problem by leaning the idle circuit excessively, masking the problem. One of the clues is to watch your rubber fuel line between the carburetor and fuel pump. Rev the engine up and watch this line. If it moves at all, there's too much pressure in the line. Another clue is the inability to bring the idle speed and mixture into proper trim.
Checking the fuel pressure I was putting out 6-8 lbs of pressure from the Mechanical Fuel pump. Installed pressure valve. Now at 1 1/2 - 2 lbs.
I may a come across the solution. I hope.
The other changes re:heat from the exhaust header has probably benefited overall performance
1) Reducing the Fuel Pressure to 1 1/2 - 2 lbs, by
installing a regulator.
2) Replacing wires equaled out the lean/rich issue between 1/4 & 2/3
After talking with Pierce Manifold his recommendations had me tear about the carb again and check the power valve. It was fine. He told me that Webers like to run advanced and the speed idle screw should be a close to 1 turn in as possible. The idle mix close to 1 1/2 out. If the idle speed screw is in too far the other jets get
exposed and come into play at idle ( ie. rich). So you need a large enough idle jet to give enough gas at idle to keep you from using the speed screw to compensate.
3) I advanced the timing 4 D so its at about 16-18 BTDC.
4) increased the jet size to .70. This allowed be to back off the idle speed and have mix at about 1 1/2.
It now runs smoother and stronger.
At a Triumph club Tech session a member friend (Dan) adjusted my timing by ear. He listened for smooth acceleration. After a test drive we checked with a timing light. It was advance to almost the end of the gauge. 24 BTDC I believe. Was able to reduce idle screw setting even more. Runs great, plug color Tan.
After a hot day of driving I my idle would not return. The choke was stuck on. After removing the cover I saw the lever fall off. I put it back on and turned the choke idle adjustment way off to get home.
I call Pierce manifold and described the problem. They said the lever and shaft were a unit. I could get it to fit back on but it was loose. I also found a little carbon on the choke diaphragm. One of the screws was missing. I cleaned that up and replaced the screw. After ordering a new lever unit $20. I thought why not use JB Weld to lock the lever to the shaft. Waiting for it to dry now.